Wednesday, September 26, 2012

Mac n' Cheese Project...Success!


Creamy Mac n Cheese Bake
The project was a success!!

I did it!!! I made my Baked Mac n Cheese!!! And better yet...it turned out fantastic!! This was another creation made for one of my epic wine nights with my awesome friend. Had this the same night as the Baked Spinach Dip. Not gonna lie, this wasn't completely my creation. I looked up several recipes and found one that I wanted to sort of follow. So it has a bit of this a bit of that, and of course some of my own style and tastes in it!

I've probably found about 50 different recipes for different types of mac and cheese. So finally being able to look through enough and then piece together my own concoction was actually pretty fun, but I'm a nerd like that and yeah...Anyways, let's move on.

This is put together in about 3 steps: noodles, sauce, bake...OK maybe a 4th step, enjoy! OK so let's get started! Here's your grocery list.

About 3 cups of elbow macaroni
1/4 cup of butter
1/3 cup all-purpose flour
1/4 cup chicken broth (reduced sodium if wanted)
1-1/2 cups of milk AND probably about an other 1/2 cup to add while the sauce is thickening just so it doesn't get TOO thick--I used 1%, you can use whatever you want though, fat-free if you want to reduce the calories and whatnot
1 cup sour cream (I used the "light" sour cream, use whichever you want)
About 10-12 oz of Velveeta Cheese
1/3 cup grated Parmesean
3/4 teaspoon ground mustard
1 teaspoon black pepper
1/2 teaspoon garlic powder
1/2 teaspoon onion powder
2 cups cheddar cheese (reduced fat if you wish)
Parmesan goldfish
Green onion

It seems like a lot of stuff, and it kind of is. But I had a lot of it in my fridge and pantry already so my grocery list wasn't too daunting.

So, first things first. You're going to preheat your oven to 350 degrees.

Now, get a pot and fill it with water and get that heating up to a nice boil. And while you wait for that water to boil...which will seem like an eternity. Especially if you're like me and somehow turned the wrong burner on and didn't realize for about 10 minutes...Let's get started with the cheese sauce!

In a medium sauce pan (I used my 3 quart one), melt the butter over a medium heat...


...and then stir in the flour until it's smooth. Then you're going to add in the chicken broth and milk, slowly. So don't just dump it all in then stir. Pour it in as you stir. Then it should look like this...

I know, it doesn't look like anything special yet. Just wait...

You're going to bring this to a boil and then stir and cook it for about 2 minutes. In this time it will thicken up. And keep an eye on that water you're boiling for the noodles. Is it boiling yet? No? Mine wasn't either. But if it is cook the macaroni according to the package directions.

Once the cheese sauce had thickened up some, reduce the heat and add in the sour cream...


Then the Velveeta...


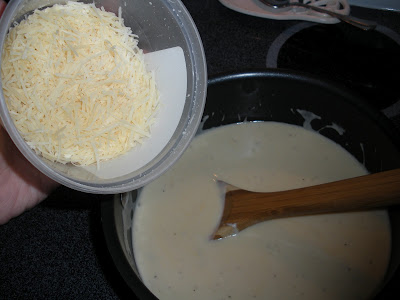
And the Parmesan and the spices!


So, your Cheese sauce is going to be a little lumpy at first, obviously the Velveeta and Parmesan need to melt and blend, and the sour cream just needs to be stirred in. But as it melts it will start to look more like the picture below. And you're going to stir that until it's smooth. And chalked full of delicious cheesiness!


How are your noodles doing? Cooking yet? Mine were! OK, that's a lie. Mine just started cooking because of my delay with having the wrong burner on. How I did that, I have no idea.


OK Now is your sauce smooth? I added more milk here just to make the sauce a little thinner, I felt it was getting a little too thick and I wanted a creamy mac n cheese, so I figured adding a bit of extra milk wouldn't hurt--and it didn't! Yay!


Okie dokie, next step is to drain your pasta when it's ready. And always keep an occasional stir in your cheese sauce if it's done before the pasta is. When you've drained your noodles, put them back in the pot and add in the 2 cups of cheddar cheese and stir it all up to get the cheese to melt around/on the noodles.


Fantastic! Now you're going to need a 13x9 baking dish. And you're going to want to grease it. I just sprayed some PAM on mine, it worked out quite nicely! Are you ready for what comes next? You guessed it! Pour that delicious smelling cheese sauce all over those cheddar cheese coated noodles!

I just wanted to start eating it right about here. Hello, it looks delicious already!


You're going to mix that all up a bit, careful not to spill it over the sides. I may have lost a noodle or two doing that. Oops! Alright now as tempting as it is to just start eating it. Don't!! And don't cover it up, keep it uncovered. It goes in the oven for about 30 minutes. Keep yourself busy during this time and I don't know, do some dishes?


AHHH it looks soooo good!!!


While that's baking take some Parmesan goldfish, however much you want really, and crush them up. Why? Well because I wanted a nice crunchy crust on top of my baked mac n cheese. So I crushed some goldfish! Not until they're dust that won't work very well. Use your judgement on how crushed you want your goldfish.


Once that 30 minutes is over take the dish out of the oven. Sprinkle the top with the crushed goldfish, some extra Parmesan cheese if you want, and about 3 or 4 chopped green onions. And it's going to go back in the oven for about 10 more minutes.


OK so now 10 more excruciating minutes have gone by...are you ready? Are you? I sure as hell was. So the point of putting the mac n cheese back in the oven is to get the top part a little bit crispy. The goldfish crackers do that and I just like the idea of the extra Parm cheese and the green onion. Here we go, pull it out of the oven and listen for the choir to sing as you do...or in my case, my dog.


Boom! There you go! Hello amazing taste bud sensation!!

This recipe is definitely in my book now and will most certainly be making it again. Hell, even just writing this entry and looking at these pictures I want to make it again right now. Holy crap! This got big thumbs up from my wine night buddy, my brother, and our roommate. And me of course. So I hope you enjoy it, if you choose to make it. I really like that the ingredients in here definitely allow me to reduce the fat content if I so choose. I sort of did it this time around. Mainly because I had most of the ingredients in my kitchen already!

I'll leave you with just one more picture...


'Til Next Time!!

Sunday, September 16, 2012

Baked Spinach Dip


Baked Spinach Dip in a Sourdough Bread Bowl

This is an absolute favorite of mine. How can you go wrong with spinach dip? No matter what, there's a 98% chance that it's going to be amazingly delicious. And it's relatively easy to make! The hardest part about this dip is hollowing out the bread bowl, I still haven't mastered it. I just like to look at it in the way that, because I haven't mastered it...I must need more practice and therefore must bake my spinach dip more often. Practice makes perfect right? I really looked forward to writing this blog, mainly because I needed more pictures to post as I write my entry.

This pic up there ^^ is from last Thanksgiving. I only took the picture of the finished product. Don't worry, I made this last night for my buddy, we were having one of our epic wine nights. It's fairly simple, he brings a couple bottles of wine and I make food and then we just hang out. It's mellow and low key, but always so much fun. Not to mention my brother and roommate enjoy getting in on some of the food if they're around the house. When I told my friend that I was making this spinach dip he asked how he got so lucky to have both my baked bread bowl spinach dip and creamy baked mac n cheese (yes I figured it out from my Boston trip, I'll write that entry soon). My level of awesomeness rose in his eyes.

OK so there's a couple different ways to do this recipe too, which is fantastic because with either version the result is ooey-gooey yummy goodness!

2 packages cream cheese (8oz each), softened
1 cup mayo (I personally hate mayo but it works with this recipe)
1 package (10 oz)  frozen chopped spinach, thawed and squeezed dry
1 cup shredded cheddar cheese
1 can (8oz) water chestnuts, drained and chopped (or you can sub about 1/2 cup chopped white onion)
5 bacon strips, crumbled (or you can use bacon bits, and put in as much as you want really)
1 green onion chopped
2 teaspoons dill weed
1 garlic clove, minced (or about 1/2 teaspoon garlic powder...b/c I like that extra garlic flavor)
1/4 teaspoon black pepper (or more if that's your thing)
1 round sourdough loaf (make sure it's unsliced)

 I was insanely organized this time when making this dip. I know I surprised even myself. First things first, take the cream cheese out of the fridge about 15-20 minutes before you start, this will allow it to soften up and make it easier to beat. And you can use either regular or the light version. I used the light version last night and couldn't even tell the difference in taste so if you want to save yourself some calories go for it!


The next thing I did was chop up the water chestnuts and green onion. For the water chestnuts I used La Choy, you can find them in the Asian section of your grocery store most of the time.


Next up is that spinach. It's frozen so I put mine in the fridge about 6 hours before I was going to make this. Yeah, that wasn't long enough. So I popped it in the microwave for a couple minutes and that did the trick. Squeeze out as much of the water as possible. I usually spread the spinach out on a few paper towels and roll it up then squeeze the life (and water) out of it. Resulting in this -->


There we go, that's the prep work for this dip. Well, the dip part of the dip anyways. Putting this together is fairly easy.

Feel free to preheat the oven now to either 375 or 350 depending on if you're doing 1 big bowl or 2 smaller ones. Aaaaaaaaaaaaaaand take the cream cheese and put it in a large bowl.


Next, put the 1 cup of mayo into the bowl...


Take an electric hand mixer and beat the cream cheese and mayo together until it's smooth like so...


Here is when I put the hand mixer away and grab just a regular mixing spoon, since the cream cheese/mayo is soft it doesn't take a lot of effort to stir in the remaining ingredients so it won't kill your hand/arm if you mix it together by hand.


I like to add in the spinach next and mix it in before I add the rest of the stuff.


Water chestnuts, green onion, and the cheddar cheese go into the mix. Followed up by...


BACON!!!! I just used Hormel real bacon bits this time. It's a lot of work to cook just 5 pieces of bacon and these taste pretty delicious anyways so I save myself that trouble.


OK now, we gotta add in the spices...

Dill Weed, Black Pepper, Garlic Powder (or a garlic clove),
and Seasoning Salt
Mix it all up until everything is well blended. There shouldn't be any huge chunks of spinach or cheese, it should all be evenly distributed and mixed in. Now, you could just eat it like this. It's delicious, but warm spinach dip is just too good to pass up, right?

Hello, delicious.

Alright, put that aside for just a few minutes and grab that sourdough bread bowl! So I usually get one big round loaf of sourdough bread. Unfortunately my grocery store was out of them yesterday, so I compromised and bought 2 smaller sourdough bread loaves. I think I may even like doing it this way better, instead of having everyone crowd around one bowl, you can have two!


So here are my two "mini" loaves. They're still a good size, so maybe I should call them medium loaves, not mini.


Slice off the top of the loaves, but don't discard them you'll still need them. But only slice off the top inch or so, you need to have enough of the loaf to create a decent bowl. I probably cut off a little too much of this bowl up there ^^


To hollow out the bread bowl, take a serrated knife and cut around the edge, leaving about a 1/2 inch layer of bread. You don't want to break the crust of the bread because then you'll end up with dip leaking out while it bakes. Now what I usually do is try to angle the knife a bit so I can pull the middle chunk up and out from the loaf.

Then take the knife and cut away at the rest of the insides of the bowl until it's completely hollowed out only leaving a thin layer (about half an inch) around the edges. I use my hands to scrap away at the bread. I also try to cut the big middle chunk out nicely so I can cube the bread and use it for dipping later.

These smaller loaves made it easier to hollow out. So maybe I've solved my bread hollowing issue from the past.


So now you'll either have 1 large bread bowl, or 2 smaller bread bowls. Either way we're good! Now that oven is preheated, right? When I make 1 large bowl I preheat my oven to 375 degrees. Last night since the bowls were smaller I preheated the oven to 350 degrees.

Next step is to fill those bowls up with the yummy, yummy dip!


Then put the "lids" back on the bowls...or bowl depending on how you're doing this.


Drooling yet? If you're not you should be. I am, actually I'm super excited because I have left overs that I'm going to eat as I watch some football today. AZ Cardinals need to step it up currently...


Anyways, wrap the loaves separately (or just the one loaf/bowl) in aluminum foil and place on a baking sheet.

Pop them in the oven now!!! For 1 large bowl bake it at 375 for 1 hour (60 minutes, yes I know it's a long time to wait for dip. But fear not. It's worth it.) OR for 2 smaller bowls bake at 350 for 45 minutes.

I like to serve this dip with the cubed sourdough from the inside of the loaves, wheat thins, carrot sticks, celery sticks, plain ruffles potato chips...anything really that's the beauty of this dip!


Voila! It's ready!! Feel free to wrap up any extras and reheat them in the oven the next day...if there are any leftovers that is. If there are, just reheat in the oven at 350 until everything is warm. Keep it wrapped in foil as you reheat though.

Hope you enjoy this as much as I do, and anyone who's been lucky enough to eat it with me!
'Til Next Time!!

Sunday, September 9, 2012

Big Soft Ginger Cookies


Big Soft Ginger Cookies

Much like my Snickerdoodles from last time. I usually make gingersnaps for Christmas. However, I found this recipe in one of my baking books, soft ginger cookies. I thought the idea of it was interesting. I have a few friends who like the taste of gingersnaps but don't particularly enjoy the crunchiness of the cookies. So these are perfect for them! And these cookies can be for Christmas or anytime really. Who says there's only a certain time of the year to eat these delicious cookies? So grab a couple of bowls and a mixer (if you have one) and let's get started!!

Here's what you'll need!!

3/4 cup of butter, softened
1 cup sugar
1 egg
1/4 cup molasses
2-1/4 cups all-purpose flour (I added about an extra 1/4 cup)
2 teaspoons ground ginger
1 teaspoon baking soda
3/4 teaspoon ground cinnamon
1/2 teaspoon ground cloves
1/4 teaspoon salt
Additional sugar

OK! So preheat your oven to 350 and grab a bowl...or mixer!


First thing you're going to do is cream the butter and sugar together until it's light and fluffy like so. Remember, the butter needs to be softened first so take it out of the fridge about 30-45 minutes before you start the cookies.


Next you're going to add in the molasses and the egg. Beat it until everything is smooth and mixed together nicely.


It should look like this when the molasses and egg are mixed in with the butter and sugar. So this was around the time my dog started going nuts. Actually, she goes nuts anytime I pull the eggs out of the fridge. When she's been good I give her an egg. Apparently a raw egg every once in a while is good for a dog's coat. And it keeps her distracted for all of 20 seconds.


In a separate bowl combine the flour, ginger, baking soda, cinnamon, gloves, and salt. I totally forgot about the salt when I made them...it wasn't until I almost put the first batch in the oven when I realized I'd forgotten it. Oops, good thing I read that part of the recipe when I did.

Now slowly mix in the dry ingredients with the molasses mixture. Don't just throw it in all at once unless you want to clean up the big flour cloud in your kitchen. (As I've said before.)


There we go, just mixing in the dry ingredients. Remember not to over mix, otherwise your cookies won't be soft. They'll be tough, and that would defeat the purpose of the soft ginger cookies.


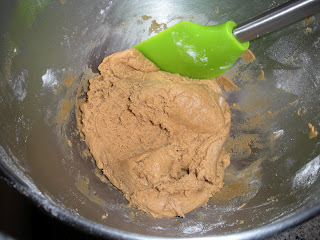
The dough shouldn't stick to the sides of the bowl too much. That's why I add the extra flour. Kind of looks like chocolate ice cream in this picture, doesn't it?


Alrighty, so now that the dough is ready you can start forming it into 1-1/2 inch balls. Remember these are big cookies so that's why they're being rolled into 1-1/2 inch balls instead of the more common 1 inch. Roll the cookie balls in the additional sugar and place on a baking sheet about 2 inches apart so they don't spread and connect.


Toss them in the oven for about 10 minutes. Remember oven temperatures and cooking times can vary so keep a close eye on the first batch so they don't burn. I turn the pan around about halfway through the cooking process. The cookies are done when they're puffy and lightly browned. It's a little difficult to tell when they're browned because the cookies themselves are brown...so just use your best judgement and trust yourself.

When they're done remove the cookies from the baking sheet to wire racks to cool completely. Store in an air tight container for probably up to a week, if they last that long. These taste so good when they're a little warm, my roommates liked them a lot...so did my dog when I dropped one. Oops :)


Hope you enjoy these as much as I did. They're really easy to make too, which is always a bonus!!
Always a pleasure!
'Til Next Time!!