Monday, August 27, 2012

Chewy Delicious Snickerdoodles


Snickerdoodles!!

So on Saturday, I made some cookies because the dance studio I dance at (dancing at a dance studio crazy right?) was having a showcase and I wanted to help out by making some treats for everyone to go along with all the other food we had! I was a little pressed for time and I didn't want to go overboard with the cookies so I thought I would keep it simple and make some cookies. Everyone loves cookies right? Well, maybe not everyone but I'm a firm believer in the fact that if you don't like cookies, you're wrong. Just kidding, but seriously, cookies are delicious.

As I was making these cookies my step-brother and our roommate kept wandering into the kitchen sniffing the air and asking me what I was doing. I should have told them they had to come to my showcase if they wanted any cookies. The more people who came to the studio the better right? Well, too bad I didn't do that. It's ok because the cookies turned out great and the showcase at the dance studio went the same way! Speaking of dance, holy wow I'm sore from yesterday. We did a few numbers and then we hung around afterwards just dancing with the DJ who is part of a break dance crew goofing around and trying different moves. Yep...this is why I'm unable to move much, even today. Well that and I went out drinking with my best friend afterwards, but that's another story.  :-)

Anywho...these cookies are pretty simple to make and taste delicious! Here's what you'll need...

1/2 cup butter, softened (take it out about 30-45 minutes before you start)
1 cup of sugar
1 egg
1/2 teaspoon vanilla extract
1-1/2 cups all-purpose flour (plus add an extra ~1/4 cup)
1/4 teaspoon baking soda
1/4 teaspoon cream of tartar
1 teaspoon ground cinnamon
2 tablespoons sugar

I usually use my kitchen-aid stand mixer when I'm doing cookies because it's so much easier to mix the batter/dough well. If you don't have one no big deal, just as long as the butter is softened enough you can do it by hand. Or you can use a hand mixer.


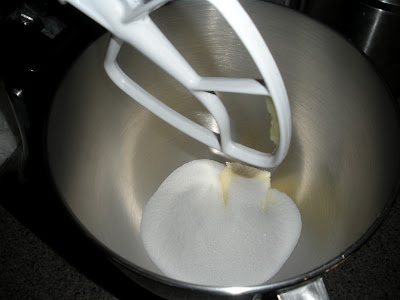
Preheat the oven to 350 degrees and grab a bowl. In a large bowl or in the bowl of the stand mixer cream the butter and 1 cup of sugar together until it's light and fluffy, like so...


Oooooo nice and fluffy butter and sugar! Alright next up the egg and the vanilla need to be mixed in.


Mix it until it's well blended. Then grab a medium bowl and combine the flour, baking soda, and cream of tartar. You're going to slowly add the dry mixture into the creamed mixture. Don't just add it all at once and turn on the mixer...unless you want to clean up a cloud of flour dust. Which, trust me it's not as fun as it sounds. Not. At. All.


So by now your dough should be looking pretty good and consistent. No huge lumps and stuff in it, but like everything else in baking do not over mix the dough, it'll make your cookies tough instead of delicious and chewy! Now get that 1 teaspoon of ground cinnamon and 2 tablespoons of sugar and mix them together in a small bowl.


Alright so if your dough looks like this you're good to go! Start getting them ready to bake by shaping them into 1-inch balls and roll them in the cinnamon sugar. I like to put the dough ball in the bowl and just shake it around so my fingers get the least amount of sugar on them possible. It gets in my nails and it bugs me and I wash my hands like 500 times.


Place them about 2 inches apart on the baking sheet. Make sure it's a cookie sheet that has at least 2 edges with no sides. I always bake my first batch with only 9 cookies on it. That way if I screw up the baking time or if I need to add more flour because the cookies spread too much, at least I didn't mess up a whole dozen cookies. I don't know, it makes sense to me. Haha :)


Bake them for about 10 minutes (I put them in for 7 minutes then switch the pan around and bake them for another 3). Times will vary by oven so just watched the first batch carefully. They're done when they start to brown just a bit on top and when the bottoms are nicely browned, not burnt.


Now, my cookies did this weird thing where they'd be all puffed up then after they cooled for a couple minutes they'd cave and dip in the middle. I think it added character to the cookies, didn't affect the taste at all they were still deliciously chewy! Let them sit on the pan for a couple minutes (1-2) then move them to a wire rack to cool completely. Or you can serve them warm, trust me AMAZING. So I usually make these cookies for my sister at Christmas, but they're really good for anytime of year!


Questions? Comments? Concerns? Suggestions? Feel free to ask or let me know!

Hope you enjoy these as much as my dance studio did!


'Til Next Time!!


Sunday, August 19, 2012

Lemon Curd Cupcakes


Lemon Curd Cupcakes

I love lemon. The sour tartness of the juice is so yummy. When I was a kid I would take the lemons out of my water or whatever drink I had and just eat the lemon wedge. Mum thought I was strange for it, Dad thought it was funny. Lemons add such a great flavor to any food, in my humble opinion. Now when I say lemons add flavor I don't mean drown whatever you're making in lemon. No, that wouldn't be bad, that's like when you eat spicy food and it's so spicy all you taste is the spice, you don't get any of the other flavors of the delicious food.

Much like the Raspberry Truffle Brownies I was staring at these for a couple of weeks before deciding to make them. Granted, the only thing that held be back one week was the fact that I didn't have any lemons and I was way too lazy to go to the store. Well, lazy and I knew if I went to the store for lemons I'd come back with so much more and I didn't want to spend extra money.

So there are a few parts to this recipe. The Lemon Curd, the actual cupcake, and the frosting. The lemon curd has to sit for about an hour and a half so let's start with that. Here's what you need...

Lemon Curd:
3 tablespoons, plus 1-1/2 teaspoons sugar
3 tablespoons lemon juice
4-1/2 teaspoons butter
1 egg, lightly beaten
1 teaspoon grated lemon peel (or 1/2 teaspoon lemon extract if you don't have any)


First things first, get everything together. Don't be the disorganized mess I am sometimes running around the kitchen like a chicken with it's head chopped off. So grab a saucepan (I just used my 1 quart one, since it doesn't need to be a huge pan). On a medium heat, cook and stir the lemon juice, sugar, and butter until everything it melted and smooth and the sugar is dissolved. Like this picture.


Next you're going to take a little bit of the hot mixture and pour it into the lightly beaten egg. Beat it a little bit to get the mixture to come together some. I just used a fork. Try to get it pretty well mixed together because otherwise when you put this back in the saucepan, you'll get little chunks of egg...like I did.  :-)


Pour the egg/juice/sugar/butter mixture back into the saucepan with the rest of the hot mixture. Bring this to a gentle boil. You should be stirring the curd constantly as it is coming to a boil. ( I need a good synonym for mixture.)

Note: gentle boil, not a rolling boil. What's the difference you ask? Basically there should be a steady stream of bubbles coming to the surface, but the surface won't consist of ONLY the bubbles jostling it. This is a gentle boil temperature should be between 140F and 190F if you're going to gage the temperature.

See my mistake was I didn't start stirring the curd constantly when I added the egg so I got little bits of egg
floating around in my curd, no worries if this happens. I didn't notice when I was eating the cupcakes.

So your curd is at a gentle boil and you are stirring CONSTANTLY. Cook it for about 2 minutes more or until it's thickened up. Then you'll add in the lemon peel, take it off the heat and let it cool for about 10 minutes. Then, you're going to cover and chill the curd for about an hour and a half.


This is what it'll look like once it's chilled and thickened up in the fridge for the hour and a half. While you're waiting for this you can take probably an hour break or so and do some other stuff: dishes, laundry, read a book, watch some TV. Then you can come back and start on that cupcake batter!

So for the cupcake batter, here's what you'll need...

Batter:
3/4 cup butter, softened (I usually pull the butter out of the fridge 45min-1 hour before)
1 cup sugar
2 eggs
1 teaspoon vanilla extract
1 teaspoon grated lemon peel (you can sub in lemon extract again if need be)
1-1/2 cups cake flour (if you don't have cake flour you can use about 7/8 of a cup of all-purpose, but I recommend using cake flour. Pillsbury makes a good one)
1/2 teaspoon baking powder
1/4 teaspoon baking soda
1/4 teaspoon salt
2/3 cup buttermilk

First grab a large bowl and beat the butter and sugar until it is light and fluffy.
Actually no FIRST, preheat the oven to 350 degrees. Then beat the butter and sugar until it's light and fluffy.


OK this is what butter and sugar should look like when it's light and fluffy. Big thing is the butter needs to be softened but not so soft that it's halfway melted. You do that, and the mixture will be more creamy than fluffy. Key words are LIGHT and FLUFFY. Remember that in any baking.

Add the eggs next, one at a time. Beating well after each addition. You want the egg mixed in really well. So your batter should look like this now...


Does it look like that? Good! Or...if it doesn't...don't worry I'm sure we can figure something out. Now add in the vanilla and lemon peel. And even though my picture doesn't show it. Mix them in!!


In a separate bowl combine the flour, baking powder, baking soda, and salt. Then get your 2/3 cup of buttermilk ready. I added a tiny bit of extra flour, probably around an extra 1/8 to 1/4 of a cup.


What's you're going to do is add some of the flour mixture to the creamy batter and mix it in. Then add some of the buttermilk and mix it in. Alternating until it's all mixed in, but again like I've said before DO NOT OVER MIX THE BATTER!!!!


Voila! The Batter is complete!! Now time to load up the pan!

Line the muffin/cupcake cups with paper liners, or aluminum if that's what you have. Both work just fine.


So this part it really important. Only fill the cups 3/4 full. I made the mistake of thinking, "Hey I want a little bit bigger cupcakes I'll just fill them all the way full!" You'll see why in a bit...anyways don't fill them this full, you'll regret it possibly, and pop them in the oven for about 20-25 minutes.


Here's what they look like about 8 minutes into cooking. I thought they looked nice...then I realized they just started cooking and they were starting to come over the sides of the cups already. I switched my pan around at the 15 minute mark. I do this just so in case my oven has some hot spots the heat is evenly distributed among the cupcakes as they bake. by switch I mean I turned the pan around.  The cupcakes are done when a toothpick into the center of a cupcake comes out clean.


Oops...they spread and decided to connect with each other. This is why you don't fill the cupcake cups up more than 3/4 full! Ahhh I was so frustrated with myself. It's ok. This can be fixed. Let the cupcakes cool for about 5 minutes then take a spatula and gently separate the parts of the cupcakes that have molded together. Wiggle the cupcakes around a bit just to make sure the tops haven't completely dislodged from the base of the cupcake. Then wait another 5 or so minute before removing them from the pan and onto a wire rack to cool completely.


Much like in my Boston Cream Cupcakes it is highly important for you to let these cool COMPLETELY. Again, go do something else for about 30-45 minutes. Just relax or do some dishes. Then after half an hour or so you can come back and start filling the cupcakes with the lemon curd. You can do this in the exact same way as I did for the Boston Cream Cupcakes. You can use a pastry bag, a zip-lock bag with a hole cut in the corner and put a decorating tip in it, a frosting pen, or a decorating tube thing. Use a "tip 1" to fill the cupcakes, this is basically a round tip that reminds me of what the tip of a pencil or pen looks like. And what do you know, if you're frosting a cake or something this tip will allow you write words and stuff!

Just like last time, you can either use a cupcake corer to hollow out the center of the cupcake then replace the top circle once it's filled like so...


Or you can just shove the tip (works pretty well too) into the cupcake and fill it until the top begins to crack. This can take a bit of time and patience, especially if you're like me and had little bits of egg in the curd that I had to keep picking out because it kept clogging up my decorating tip. Again... I say oops :-) Oh well, it happens.

Now, finally we can get started on the frosting. We're almost done with these delicious treats! Here's what you'll need!

Frosting:

2 tablespoons butter, softened
1/2 teaspoon vanilla extract
dash of salt (less than 1/8 teaspoon)
2 cups confectioner's sugar
2-4 tablespoons of milk

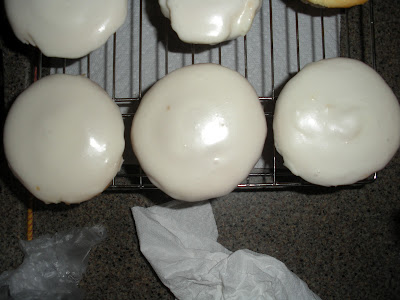
In a small bowl combine everything except the milk. Then add in enough milk to get the frosting to the right consistency so it'll be easy to frost. Drizzle, dip, use a frosting spatula, I tried all 3 ways to frost my cupcakes. With these ones, I did a combination of dipping and drizzling the frosting on. I think I had a slightly difficult time because the way my cupcake molded together because of my faux pas.

Not totally 100% pretty, but for the most part my cupcakes looked pretty good.
Minus the few cupcakes where the edges broke off and made them look lopsided and crooked.

Store these in the refrigerator in an air tight container and eat whenever you want. I would suggest eating them within a week of baking them though, you don't want them to go stale. Share with friends and family if you so choose. Or keep them to yourself!

Hope you enjoy these as much as I did!
'Til Next Time!!

Sunday, August 12, 2012

Queso and Salsa, Hello Deliciousness


Chips, Salsa, and Chili Queso

Alright, I admit it, I'm a sucker for chips and salsa...and queso. More specifically Chili's Chili Queso. The idea of making copy-cats, replicas, clones, whatever you want to call them, has become quite popular. Everyone wants to be able to make their favorite restaurant dishes from the comfort of their own home. It makes sense to me, it's probably cheaper, and you can alter the ingredients slightly if you're looking to cut down on some calories and fat content. So I've picked up a few recipes along the way and I even have a few cookbooks that are strictly clone recipes from numerous restaurant chains. The ones that I've made so far (Chili's Chili Queso, Outback's Caesar Salad dressing, P.F. Chang's Spicy Chicken...) have all turned out really well and taste just like the restaurant version! And a lot of them are relatively easy to make, which is always nice. These are perfect to please a crowd or even if you're just looking for a snack for yourself, just try not to eat the whole bowl of queso or salsa all at once...it's a lot of food. I ate too much yesterday and felt stuffed for the rest of the night.

Chili's Chili Queso is probably one of the easiest recipes to make. Throw a bunch of stuff in a pot and let it melt together and simmer for 20 minutes. Sounds simple enough right? Why yes, yes it is! OK so here's what you'll need for the Queso:

The spices you'll need...don't mind the muffins
those will be another entry some time :)

1 package Velveeta (16 oz)
1 can Hormel Chili, no beans not chunky (15 oz)
1 cup milk
1 tablespoon lime juice
4 teaspoons Chili Powder
2 teaspoons Paprika
1/2 teaspoon Cayenne Pepper
1/2 teaspoon Ground Cumin


OK So this is really simple. Take the Velveeta and cut it into cubes or slices and toss them in a saucepan. I use my 3 quart Cuisinart one, it's big enough that I don't have to worry about anything spilling over.


Try to cut the Velveeta into even pieces so it'll melt evenly and you won't be waiting around for one chunk of cheese to melt. Next you are going to add in the Hormel Chili...


Once that's in the pan, I usually put it on the stove so the cheese can start to melt as I add in the remaining ingredients. Heat the cheese and Chili on a medium heat. Add in the milk and lime juice. The Velveeta should be starting to melt at this point and you should be able to stir it up a bit just to get the chili mixed in a little more. Next, add in the spices. Once it's all in just stir the Queso until the Velveeta is all melted. You pretty much want to stir it constantly until the chunks of cheese are completely melted.


Look at the yummy goodness!! So once everything it melted. Turn down the heat to low and let the queso simmer for about 20 minutes, stirring every couple of minutes. This is when the queso will thicken up so it's not really runny, because who really wants runny queso? It won't stay on your chip!! So after the excruciatingly long 20 minutes, your queso is ready to enjoy! Careful, it will be hot. And, if you have left overs, this reheats very nicely in the microwave too.

Soooooooo, what's queso without some salsa to go along with it? I've been a chips and salsa addict since I was about 12 years old. Just can't get enough of it. It's so simple, so delicious, and I like to tell myself that it's healthy. It is right? I mean...tomatoes and all that, right? Yes? No? Oh well. So the salsa is also pretty simple to make. Just a few ingredients pureed in a food processor and boom! Deliciousness! Here's what you need:

1 can Hunt's Petite Diced Tomatoes
1-1/2 chopped Jalapeno (seeds and all)
About 1/3 or 1/2 chopped White Onion
Cilantro
Garlic Powder, Chili Powder, Black Pepper
Ground Cumin
Put the tomatoes in the food processor (Mine's a mini food chop holds about 3 cups perfect for smaller things like Salsa!)

Chopped Onion goes in next followed by...

Mmmmmm Jalapenos! I used about 1-1/2 because I like spice. Use more or less jalapenos depending on how spicy you want your salsa! Puree the salsa a bit here just to start to get everything all mixed together.

Top it off with some Cilantro, again do this to taste, put a little bit in, puree it up a bit, taste the salsa, decide if you want more or less cilantro just like you did with the jalapenos.


Now you want to add in the spices, not too much don't want them to be overpowering, but you do want to be able to taste them! I used probably about 1/2 teaspoon to 1 teaspoon of each. Again taste, taste, taste!! See what you like!

Puree the salsa in your food processor (or blender, that would work too) until all the big chunks are gone. You don't want the Salsa to be completely liquefied, then it'll seem more like soup or something. But I like my Salsa to be pretty nicely pureed so it's like it is in the restaurants. I wanted my salsa to be sort of like Chili's salsa, so it would pair nicely with the queso. I covered my salsa and let it sit in the fridge for a couple of hours, just so it would chill and give it a chance for the flavors to come together more.

Well there ya go! Chili's Chili Queso and a delicious Homemade Salsa! Here's what mine look like, not in fancy bowls or anything after all I was just making this for me.

...and Delicious Salsa to go along with it!
Yummy, yummy Queso, if you're not drooling now...who am
I kidding, of course you are...
Hope you enjoy these as much as I do!!
'Til Next Time!!

Sunday, August 5, 2012

Garlic Beef Enchiladas


        Garlic Beef Enchiladas


So I'm not always the most organized cook in the kitchen. I have an awful habit of starting to make a recipe without reading and re-reading it the whole way through. I'll always read the recipe before I decide to make it, but then once I actually start preparing the food I totally forget to read through the instructions so I know if I need to be multi-tasking or not. This was sort of one of those cases. At least I was smart enough to chop my onion up before starting to cook the beef.

Oh my god, I did that one time when I first started cooking, why did I think it wouldn't take me that long to chop an onion? I don't know, but I must be the world's slowest chopper too. That was a disaster. That and I was trying to make biscuit dinner roll things at the same time. Flour everywhere. Anyways, that's a different story for a different time. These Enchiladas mainly consisted of me running back and forth from the stove to my trusty cookbook while trying to dodge two large dogs. I only stepped on my husky once...well twice.

I really liked this recipe, it was just a different spin on enchiladas, the garlic flavor in the beef was really different from other enchiladas I've had or made. Also, this recipe is a perfect example for me to show that not everything turns out perfectly the first time you make it. Case and point...my enchiladas really ended up being more like...well I almost ate them out of a bowl. They just wouldn't keep their shape. Yet still, quite tasty!

OK let's get started with these yummy enchiladas! Here's what you'll need...

The meat mixture:
1 pound ground beef
1 medium onion, chopped (I chopped mine into small/medium pieces so they would blend in with the beef)
2 tablespoons all-purpose flour
1 tablespoon chili powder (little extra if you want that extra kick!)
1 teaspoon salt (I cut it down a little, I just don't like a lot of salt in my foods)
1 teaspoon garlic powder (extra of this is a nice touch)
1/2 teaspoon ground cumin (I love cumin, it adds so much flavor)
1/4-1/2 teaspoon rubbed sage
1 can (14.5 oz) stewed tomatoes, chop these up a bit so you don't have random bites of huge tomato chunks

The Enchilada sauce:
4-6 garlic cloves, minced (I crush mine in my garlic press)
1/3 cup butter
1/2 cup all-purpose flour
1 can (14.5 oz) beef broth
1 can (15 oz) tomato sauce
1-2 tablespoons chili powder (I did closer to 2, but I love chili powder. love, love, love it!)
1-2 teaspoons ground cumin (use your best judgement taste, taste, taste!!)
1-2 teaspoons rubbed sage
1/2 teaspoon salt

10 flour tortillas (6 or 8 inches) (get some name brand ones...otherwise you might run into the problem that I did with the tortillas crumbling before you even cook them. Grrrrr annoying)
2 cups shredded Colby-Monterey Jack Cheese, I used more because I love cheese!!

Oh wonderful, I just re-read my recipe....warm the tortillas. Oops didn't do that, maybe that's why it went wrong. Genius Kendra, genius. Anywho let's get started!


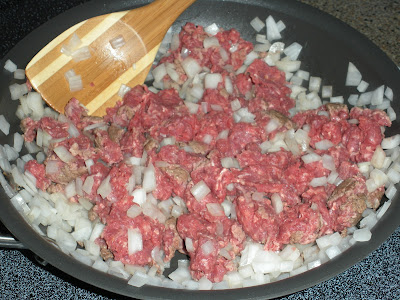
Grab a large saucepan or skillet, I used my 11in non-stick one, and cook the beef and onion over a medium heat until the beef is no longer pink. Once it's all cooked drain the beef. Return to the stove and blend in the flour and spices until they are well blended into the beef and onion. After that stir in the tomatoes, juices and all from the can!
Bring this deliciousness to a boil. After about a minute or two reduce the heat to a low setting, cover it up and let this simmer for about 15 minutes. While this is all simmering and coming together yummily (yes I'm making up my own words), you can get started on the sauce.

Grab a saucepan, I used my 3-quart non-stick Cuisinart one. Saute the garlic in the 1/3 cup of butter until it's tender. This should only be a couple of minutes (I define a couple minutes as 2-3). Stir in the flour until it's blended and smooth, this will create the roux for the sauce.

This is what my roux looked like, it smelled so nice and garlicy. Oh so yummy!! Once you're at this step, gradually stir in the beef broth. Then bring it to a boil. Keep it boiling and stir it until the mixture thickens up, should take about 2-4 minutes depending on your stove. Use your best judgement to tell when it's thickened up enough.  Now that your sauce is thickened up...pause and just quickly check on your beef mixture. Does it look good? Does it look yummy? Does it look something like....


This? Yes? Good. OK now get back to your sauce!!


So we added the beef broth and thickened it up and we're stirring it. So now add in the tomato sauce and the seasonings. Heat the whole thing through for about 5 minutes. Taste it now!! Does it taste good? Are the spices balanced? Can you taste the garlic? If you can't throw in some garlic powder. Look at the color and the pretty, pretty swirl in the sauce.


OK so now you have your meat mixture and your sauce sitting on the stove and you're looking at it going..."Ok...how to I put these things together and get them to turn out nicely?" So as you're standing looking at the delicious food on the stove don't panic...like I sorta do every time I make a new recipe.
Looks good doesn't it? Yes, yes it does now let's put it all together!!
Preheat your oven to 350F right now, before you start putting this all together! Alrighty, so take about 1-1/2 cups of the sauce and pour it into an ungreased 13 x 9 in baking/casserole dish.


Boom! That's the start of slopping this all together! Now is when I recommend warming the tortillas...you know the step that I didn't do when I made these. Pop them in the microwave for about 10 seconds or something.

Scoop about a 1/4 cup of the beef mixture down the center of each tortilla then sprinkle it with about 1-2 tablespoons of cheese...or however much you want. A little cheese, a lot of cheese it's all good!

This is where I'm thinking 8in tortillas might be better, the 6in ones were just really small.
Roll up the tortillas lightly, gently, carefully if you will. Then again, GENTLY place the tortillas into the baking/casserole dish seam side down. Once you have all the tortillas in the dish and hopefully they don't look like mine here...


Gaahh!! They're falling apart already!!! Noooooo!!! This is when I went, "eh, it's ok I'm going to cover it with sauce no one will know the difference." Ummm...yeah I was wrong. Oops, oh well didn't affect the taste, just the presentation. *Sad face*

Top the enchiladas off with the remaining sauce.


Doesn't look pretty...it's because my damn tortillas weren't warmed. I'm so annoyed with myself now. How did I miss that step?!?! Whatever, I was committed I was going through with these enchiladas whether they looked pretty or not. I was fricken hungry!!!


Cover and bake for about 30-35 minutes. During this time, clean, clean, clean all your dishes! I know, it sucks. I hate doing the dishes but it's so much easier now. You have the time to kill so just clean them!!

After the 30-35 minutes, uncover the enchiladas, sprinkle with the remaining cheese (or again as much as you want :-D ) and pop it back in the oven UNCOVERED for another 10 minutes or so, until the cheese is nice and gooey and melted.

I swear, the enchiladas are under there somewhere...Man I need to make this one again and perfect it.

Alright, I recommend letting the enchiladas cool for a few minutes, this will up your chances of them holding their form when you take them out of the dish. I didn't even bother taking a picture of the enchiladas once I plated them because it didn't look like anything. Next time, if they turn out better I'll update this and post it. I have faith in me!

So like I've said before, sometimes things don't turn out the way you want them to. You just kinda gotta get over it and roll with whatever happens. In the kitchen. In life? I don't know, I would recommend making sure at least some things go your way, it's no fun if they don't right? Hopefully these turn out better for you if you choose to make these, I'm hoping the reason they didn't was because of the tortillas.

Anywho! Enjoy these delicious garlicy enchiladas!!
'Til Next Time!!